
...Also known as the Pyle 15360, was a fixture of US railroading throughout the 60s and 70s. The beacon was a product of Pyle National; manufacturers of amphernol connectors and locomotive lights since the turn of the century.
The 15360 was a cataloged beacon that was put into service on numerous mid-western and western railroads until they were discontinued from Pyle's product line in the 80s.
It utilizes a "Gyralight-Like" motion....unlike other beacons that physically spin the bulbs, or use solid state electronics to flash halogen or xenon strobes, the 15360 reflected it's light. Inside the upper dome of the beacon is a single Par-46 bulb. The light shines down on a stainless reflector. Bent into a 90 degree angle, the reflector is mounted on a aluminum stud at it's center, tilted 45 degrees. This leaves the beacon with two slanted reflectors, facing 180 degrees apart on a 360 degree area of visibility. The stud and reflector are all connected to a 12v motor, located in the bottom of the beacon. Connected to a gear, this would make the light produce approx 100 flashes per minute.
The lights came in many different configurations, including the 15360-ZBYG, the standard amber 74 volt locomotive beacon. The lights came in 8 different voltage ranges, from 6 to 110vdc, and 110 to 250vac. In addition to amber (yellow), the lights were also offered in red, clear, green and blue.
Original bulletins and patent info on the 15360 would leave it to be said that the light was first put on the market in the mid 1950s. The earliest of these beacons had standard "Gyralight" model number tags affixed to them. It wasn't until later production that the model number tags were changed to reflect their designation as the "Pyle 360 degree Warning Light".
Friday, October 29, 2010
Tuesday, August 31, 2010


Saturday, May 29, 2010
Numberboards, cont....
Numberboards have been the main priority these days. Since I won't be able to do any major body work until later this year, I have decided to get the small stuff out of the way.
If you wanted to make your own boards, it is a very simple process.
First, we would have to get a few supplies. Including: Plexi-glass, a plexi-glass cutter, black and white spray paint (special, for plastics), contact paper, and a full-scale stencil of the number or letter you want.
The first step, would be to determine the size of your numberboards. Once this is done, you will want to measure this out, and using a small Sharpie, trace it onto your plexi-glass. Next, take a straight-edge, and score along the line, using your plexi-glass cutter. Continue to score these lines about 10 times. After that, flip the glass over, and force it to break at the line.
Now, is where the fun begins. Take your printout of the number, and cut it completly out, using a scissors or X-acto knife.
Once cut out, you are ready to start tracing onto contact paper. Roll out a sheet of it, and cut to the approxomite size of your number board. Now, you will want to trace out the entire number onto the paper. It is best if you tape the number to the paper, and then you can peel off the tape and trace under those spots, at a later date.
Now that you have your number traced, you can carefully cut out the contact paper, and set it aside for a day when you had a good night's sleep, and some coffee.
Now comes the aligning of the numbers. What I ended up doing, was sliding all of my plexiglass into my numberboard slots. I then carefully unpeeled the "2", and aligned it with the open space of the numberboard box, and rubbed it on. I repeated this process for the rest of the numbers, until all of my contact paper, was applied to the plexiglass.
The next step is easy: painting. Flip your numberboards over, place them on a piece of wood and saw-horses, and shoot a coat of white paint onto the backside of the board (the side without the contact paper). Once this is dry, flip all of the numbers over, and paint the side with the contact paper (the front, where the numbers are applied).
It is best to let these sit in a dry closet for a few days, just for them to cure. But, once they are done, throw them in the numberboard box, peel off the contact paper (revealing the white that was masked) and try them out. I was certainly not dissapointed :)

If you wanted to make your own boards, it is a very simple process.
First, we would have to get a few supplies. Including: Plexi-glass, a plexi-glass cutter, black and white spray paint (special, for plastics), contact paper, and a full-scale stencil of the number or letter you want.
The first step, would be to determine the size of your numberboards. Once this is done, you will want to measure this out, and using a small Sharpie, trace it onto your plexi-glass. Next, take a straight-edge, and score along the line, using your plexi-glass cutter. Continue to score these lines about 10 times. After that, flip the glass over, and force it to break at the line.

Now, is where the fun begins. Take your printout of the number, and cut it completly out, using a scissors or X-acto knife.
Once cut out, you are ready to start tracing onto contact paper. Roll out a sheet of it, and cut to the approxomite size of your number
 board. Now, you will want to trace out the entire number onto the paper. It is best if you tape the number to the paper, and then you can peel off the tape and trace under those spots, at a later date.
Now that you have your number traced, you can carefully cut out the contact paper, and set it aside for a day when you had a good night's sleep, and some coffee.
Now comes the aligning of the numbers. What I ended up doing, was sliding all of my plexiglass into my numberboard slots. I then carefully unpeeled the "2", and aligned it with the open space of the numberboard box, and rubbed it on. I repeated this process
 for the rest of the numbers, until all of my contact paper, was applied to the plexiglass.
The next step is easy: painting. Flip your numberboards over, place them on a piece of wood and saw-horses, and shoot a coat of
 white paint onto the backside of the board (the side without the contact paper). Once this is dry, flip all of the numbers over, and paint the side with the contact paper (the front, where the numbers are applied).
It is best to let these sit in a dry closet for a few days, just for them to cure. But, once they are done, throw them in the numberboard box, peel off the contact paper (revealing the white that was masked) and try them out. I was certainly not dissapointed :)

Saturday, May 15, 2010

Wednesday, May 12, 2010
Numberboards....
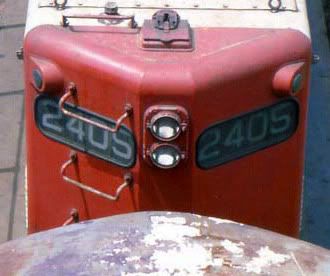
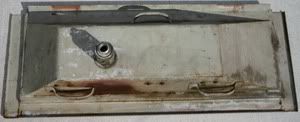
Now that spring is in full swing, I now have time to enjoy the outdoors, while I work on some of my projects. Aside from horns and other parts on the workbench, the number-board boxes have had a fair amount of work.
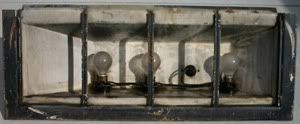
The first project was to clear out the electrical components (coming in a future post). After this, the boxes were bead blasted. Lately, I have been experimenting with plastic abrasive media for stripping paint. Needless to say, it was a very good investment!
After stripping the majority of the paint, I applied paint. The back of the box is painted with Rustoleum Enamel 'Light Machine Grey', which matched the original interior color of the 2405. After drying, the box was masked, and the interior was painted with a chrome colored paint. It would appear that these areas were originally painted as such, to increase reflectivity of the bulbs in both the class and number-board light boxes.
More masking, and the final coat of black paint on the outside, and it's done. (well, maybe a too-heavy coat of chrome paint, but no one will look inside, but me....)

Thursday, April 29, 2010
Horn Restored
My S-2M from the 2405 is now finished! No real snags, besides having to get a replacement diaphragm for the 44 bell.
The horn was stripped, lightly bead blasted, and painted into Rustoleum Safety Red, which has a good resemblance to Soo Line red.


Brasso was used to clean up the tag. After a spray of clear coat and some new drive screws, the result was pretty nice!


Wednesday, April 28, 2010

Wednesday, April 21, 2010
Jewelery, Part II
Horn-
The GP9s were originally delivered with a two-horn setup, when constructed in 1954. On the front hood was a Leslie S-2M, and on the long hood was mounted a Leslie S-25. Both horns would have consisted of two-piece, welded bells (31 and 25), along with tag-sealed, bronze power chambers.
Over the years, these horns changed around on the 400, 500, 2400 and 2500 series GP9s, but the 2405 stayed relativly the same over the years.
In 1968, the original bronze-tabbed back S-2M was replaced with a round-back, '68 stamped Lyndhurst S-2M, most likely after the original horn failed. This horn was acquired with the 2405's nose.
Of similar nature, the previous owner of the nose had in his possession a 1954 S-25 with a sealed bronze-tabbed chamber. Could it be from the 2405? At the time of asking, it wasn't for sale :(
Although I normally consider it blasphemy to strip down the original paint from a horn, especially Soo Line Red, this horn had little going for it. Most of the original paint was already long gone, and what was left of the paint was peeling at the corners. The chambers were nearly absent of any paint around the edges, and the manifold had a nasty bend near the 31 bell.
I decided to strip down the horn, and return it to it's full Soo Line glory, which will be posted soon. For the time being, here are some before photos of the restoration...


Saturday, April 17, 2010
Back in the Day....

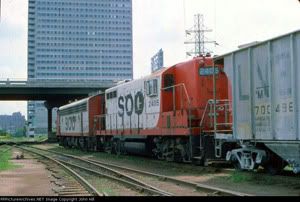
North Fond Du Lac, WI 1980, John F. Campbell Photo, T. Martin Collection

Location Unknown, 1989, R. Bee Photo, T. Martin Collection

Schiller Park, IL 1955, Dup Kodachrome, T. Martin Collection
Wednesday, April 14, 2010
And the winner is...
It took a while but the identity of the nose has finally been found.
Built as: Wisconsin Central 2405, 12/1954, No. 20015
Acquired by Soo Line in 1961
Rebuilt with a low-nose in 1996, and released as CP #8264.
Amazingly enough, it still survives to this day!
1975
Built as: Wisconsin Central 2405, 12/1954, No. 20015
Acquired by Soo Line in 1961
Rebuilt with a low-nose in 1996, and released as CP #8264.
Amazingly enough, it still survives to this day!

1975
Tuesday, April 13, 2010
Jewelery, Part I
Jewelery, aka, everything that comes off with a wrench.
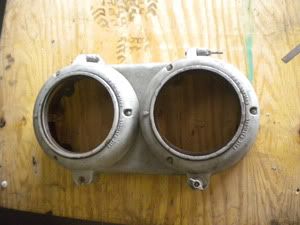
I've been quite lucky so far, to run across a good number of parts for the project, including headlight and number board components.
The headlight is complete, aside from the outside "doors", which hold the bulb. These are on order, and headed home as we speak. The bulbs that I managed to find are 12vdc, 100W Marine GE 4545s, which is a preferred choice in the collector's world. Each bulb should consume about 8.6a, if I did my math correctly.
When the GP/SD/F/E series locomotives were introduced, the number boards used were what I consider a "scoreboard style". Each of the 4 (or 5) characters on the number board have their own separate slot, where they would slide into the housing. The main purpose of this was to allow a locomotive to display the train number on the boards...for example, Train #48 would have "48" displayed. When the train reached it's destination, the conductor would go into the locomotive, remove the box, and slide in the revised train number, and continue the trip.
The 2405 in 1975, John Hill Photo
A good number of railroads used this feature, but not the SOO---at least not in any photos I have seen. These number boards lasted in service into the early 80's on most SOO GP9s, when the standard EMD style black-on-white boards came into use.
I was lucky enough to acquire a left and right hand numberboard box for the restoration. I will eventually (as time and money allows) replicate both numberboard styles. But, I am a fan of the older version, which will be the one I will reproduce first.
I've been quite lucky so far, to run across a good number of parts for the project, including headlight and number board components.
The headlight is complete, aside from the outside "doors", which hold the bulb. These are on order, and headed home as we speak. The bulbs that I managed to find are 12vdc, 100W Marine GE 4545s, which is a preferred choice in the collector's world. Each bulb should consume about 8.6a, if I did my math correctly.

I ended up buying a whole housing...
When the GP/SD/F/E series locomotives were introduced, the number boards used were what I consider a "scoreboard style". Each of the 4 (or 5) characters on the number board have their own separate slot, where they would slide into the housing. The main purpose of this was to allow a locomotive to display the train number on the boards...for example, Train #48 would have "48" displayed. When the train reached it's destination, the conductor would go into the locomotive, remove the box, and slide in the revised train number, and continue the trip.

The 2405 in 1975, John Hill Photo
A good number of railroads used this feature, but not the SOO---at least not in any photos I have seen. These number boards lasted in service into the early 80's on most SOO GP9s, when the standard EMD style black-on-white boards came into use.
I was lucky enough to acquire a left and right hand numberboard box for the restoration. I will eventually (as time and money allows) replicate both numberboard styles. But, I am a fan of the older version, which will be the one I will reproduce first.


Monday, April 12, 2010
Power-Washing....

It was much easier to power-wash the roof when it was on it's side, than it will be standing up.
After it's baptism of pressurized water, the remains of the Soo Line DuPont Duco enamel 254-34460 (Maroon) started to show through around the edges. But in this life, it will have to settle with DuPont Dulux enamel 625-8006.
Loading and Unloading...
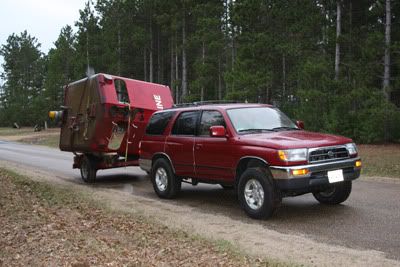
Probably one of the least anticipated parts of the project, was the loading and unloading of the nose. To add to the issue, there are some decent structural cracks in the back, which we had to be careful with.
Loading went easy, aside from the fact that we underestimated the overall size of the beast. We ended up lying it tilted on it's side, and took the trip home VERY slow.
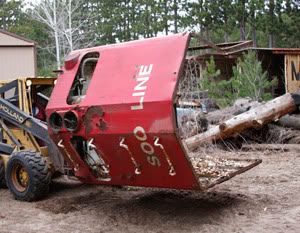
It finally got home at about 9:00pm, and we were ready for an easy offload the next day...or so we thought.
---
We used a Bobcat to get it up on the trailer, but we weren't so privileged to have one for offloading. So, after deliberation, we decided on the best route to unload the puppy.
Plan: Tie a chain from our van to the hood, to tip it off of the trailer. Tie a rope from the hood, around a tree, to some kinfolk, who would control the rate of decent, so we didn't break the already rotted and cracked side.
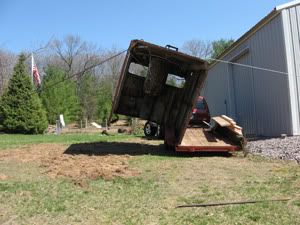
And sure enough, it worked....very smooth. However, we now had to continue to tip it, to clear the fender on the trailer, move the truck ASAP, and bring it down. Uh, Houston, we have a BIG problem....and we have this one on video! (stay tuned for that)
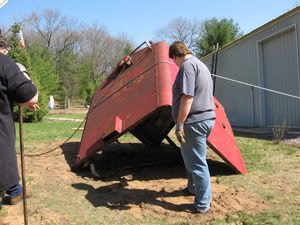
Sure enough, that small crack decided to give, and it ended up like a dead duck. But, all was not lost. We pulled her back up, and straightened her out. She was due for a weld job anyways, so it wasn't much of a set back.
Stay tuned for the next installment...
Loading went easy, aside from the fact that we underestimated the overall size of the beast. We ended up lying it tilted on it's side, and took the trip home VERY slow.

It finally got home at about 9:00pm, and we were ready for an easy offload the next day...or so we thought.
---
We used a Bobcat to get it up on the trailer, but we weren't so privileged to have one for offloading. So, after deliberation, we decided on the best route to unload the puppy.
Plan: Tie a chain from our van to the hood, to tip it off of the trailer. Tie a rope from the hood, around a tree, to some kinfolk, who would control the rate of decent, so we didn't break the already rotted and cracked side.

Almost!....

Good!....one more step to go.
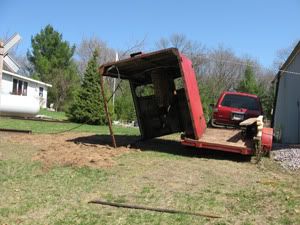
And sure enough, it worked....very smooth. However, we now had to continue to tip it, to clear the fender on the trailer, move the truck ASAP, and bring it down. Uh, Houston, we have a BIG problem....and we have this one on video! (stay tuned for that)

&%$#!!!!
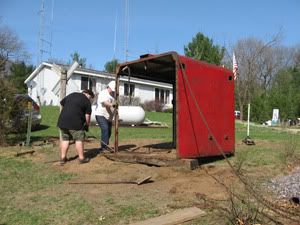
Sure enough, that small crack decided to give, and it ended up like a dead duck. But, all was not lost. We pulled her back up, and straightened her out. She was due for a weld job anyways, so it wasn't much of a set back.

Ahh...that's a little better! All leveled out, and braced up for future work.
Stay tuned for the next installment...
Sunday, April 11, 2010
Way back in 2007....
Welcome to the SOO GP9 Project! Here is where I will post news and photos of the restoration of the newest back-yard nightmare--the nose/hood from a scrapped SOO Line GP9.
This project started back in 2007, when I first discovered the nose sitting in a pile of weeds and parts at a local railroad scrapper's back yard. The nose had been sitting there since the mid-1990's when it was purchased from the CP Rail, when they shut down the old SOO Shops in Shoreham, MN (Minneapolis).
At this time I have no real idea what locomotive this nose came from...It can't be that hard, can it? Well, it's not that easy, considering photos of locomotives in the mid-1990's in Shoreham, are not that easy to come across. There are certain features on the nose that narrow it down to a few possible locomotives, but I have no definitive choice right now.
Over the next few days, I will post some of the progress that has come forth to this point.
Thanks for looking!
This project started back in 2007, when I first discovered the nose sitting in a pile of weeds and parts at a local railroad scrapper's back yard. The nose had been sitting there since the mid-1990's when it was purchased from the CP Rail, when they shut down the old SOO Shops in Shoreham, MN (Minneapolis).

At this time I have no real idea what locomotive this nose came from...It can't be that hard, can it? Well, it's not that easy, considering photos of locomotives in the mid-1990's in Shoreham, are not that easy to come across. There are certain features on the nose that narrow it down to a few possible locomotives, but I have no definitive choice right now.
Over the next few days, I will post some of the progress that has come forth to this point.
Thanks for looking!
Subscribe to:
Posts (Atom)